Scrolling through your social media feeds, it’s safe to say there’s always a new makeup tool promising flawless, easy application. First, we fawned over makeup blenders. Now? Oval makeup brushes are having a major moment of their own. Much more than a stylish tool that adds to your vanity decor, an oval makeup brush can seriously take your makeup game to the next level. From soft glam makeup looks to a full glam masterpiece, oval makeup brushes just may be the secret weapon you need to give your finished makeup look a little extra oomph. Want to know more? Consider this the ultimate guide to oval makeup brushes.
WHAT IS AN OVAL MAKEUP BRUSH?
An oval makeup brush, as you may have guessed, has an oval brush shape. This style of brush is also sometimes referred to as a toothbrush makeup brush because the brush itself somewhat resembles a toothbrush, with a long handle and a set of bristles that appear on just one side of the brush. This design is supposed to make it more comfortable to hold, while the compact bristles help create an airbrushed finish. This type of brush comes in all different sizes that can be used to apply everything from foundation to concealer to lipstick. They can even be used to smooth on skin care products. Sold yet?
OVAL MAKEUP BRUSH TIPS
Nervous about using an oval makeup brush for the first time? No need to fret! Follow our tips below for easy makeup application.
OVAL MAKEUP BRUSH TIP #1: LESS IS MORE
When it comes to using an oval makeup brush, always remember that less is more. An oval makeup brush won’t absorb your liquid products like many other brushes and blenders tend to do, so you’ll get quite a bit of coverage with minimal product. A little goes a long way, so start small—you can always build if you need more coverage!
OVAL MAKEUP BRUSH TIP #2: USE YOUR HAND
Wondering why you would need your hands if you’re using a makeup brush? When applying makeup with an oval brush, you want to avoid applying any product directly onto the brush (remember, less is more). Instead, apply the product onto the back of your hand and pick up a little bit of product at a time before applying it to your face. On the other hand, you can dot the product directly onto your face before blending it out with your oval makeup brush. This method is best saved for once you’ve used the brush a few times, so you’ll know exactly how much product you need.
OVAL MAKEUP BRUSH TIP #3: KEEP THINGS LIGHT
Oval brushes do all the work for you, so avoid using a lot of pressure when applying your makeup with one. Instead, use light pressure to buff your makeup out. No need to break out the big guns!
OVAL MAKEUP BRUSH TIP #4: GO ROUND AND ROUND
We’re sure you’ve heard of endless techniques for blending your makeup—from stippling to bouncing. But that’s not what you want to do here! Glide your oval makeup brush in circular motions over your skin for seamless blending. Don’t forget to use light pressure. Easy, peasy!
OVAL MAKEUP BRUSH TIP #5: CLEAN, CLEAN, CLEAN
Cleaning your makeup brushes and tools is super important, and your oval makeup brush is no exception. In fact, a buildup of product on the bristles of your brush can seriously affect the way your makeup applies—not to mention the more buildup there is, the more difficult it’ll be to clean the dense brush! Not sure how to clean your brushes? Head over to our article, How to Clean Makeup Brushes and Blenders.
HOW TO APPLY MAKEUP WITH AN OVAL MAKEUP BRUSH
It’s time to put those oval makeup brush tips to good use. Keep reading to learn how to curate an everyday face makeup look with the help of oval brushes.
STEP #1: PRIME, PRIME, PRIME
The first step of any makeup routine should always consist of a makeup primer. This will give you a smooth base for more even makeup application. Smooth your primer of choice all over your face.
STEP #2: APPLY YOUR FOUNDATION
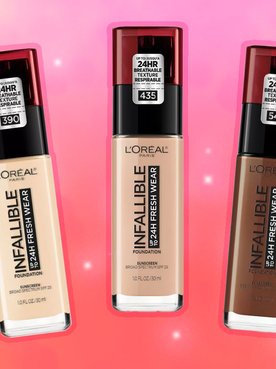
Unlike using a makeup blender to buff out your foundation, an oval makeup brush requires a little more finesse. You’ll want to use a lightweight foundation like the L’Oréal Paris Infallible 24 Hour Fresh Wear Foundation, Lightweight, which provides medium-to-full buildable coverage for a second-skin look you’ll love—the perfect match for an oval makeup brush.
Place a little foundation on the back of your hand to avoid applying too much product to your brush. Lightly dip a large oval makeup brush into the liquid formula and apply it to your face in circular motions. Build to your desired amount of coverage, continuing with circular motions until blended evenly on your skin.
STEP #3: GRAB A CONCEALER
To hide any unwanted blemishes or under-eye bags, you want to grab a lightweight concealer that offers seamless coverage, like the L’Oréal Paris Pro-Glow Concealer. Following the same steps as your foundation, apply your concealer to the back of your hand, lightly dip your small oval makeup brush into the liquid, and blend out with small circular motions.
STEP #4: ADD SOME WARMTH
Now that you have your foundation and concealer in place, it’s time to warm up your complexion with bronzer. We recommend using the L’Oréal Paris True Match Lumi Bronze It Bronzer for a subtle shimmer. Grab a medium-sized oval makeup brush, then lightly dip it into your bronzer. Apply the bronzer to the hollows of your cheeks using small circular motions. Be sure to blend until even!
STEP #5: BLUSH IT UP
Let’s define your cheeks! Using the L’Oréal Paris True Match Blush in your perfect shade, dip a small oval into your compact and apply the blush to the apples of your cheeks with the same small circular motions you've been using.
STEP #6: JAZZ UP YOUR EYES
For the perfect everyday makeup look, neutral eyes are your best bet. And yes, you can use oval brushes to apply eye makeup, too! Using the L’Oréal Paris Paradise Enchanted Scented Eyeshadow Palette, grab a small oval makeup brush and dip it a shimmering medium brown shadow. Carefully swipe the color over your lid and into your crease, then apply a deeper matte brown directly to your lid.
STEP #7: LINE YOUR EYES
You’re almost at the finish line. Use a precise black eyeliner, like the L’Oréal Paris Infallible The Super Slim Liquid Eyeliner, to line your upper lash line.
STEP #8: CREATE VOLUMINOUS LASHES
Turn up the volume on your fringe with the help of the L’Oréal Paris Voluminous X Fiber Mascara. Apply a few coats to your top and bottom lashes.
STEP #9: SEAL THE DEAL
After crafting such a beautiful look, you’ll want to lock it all in place for a long-lasting finish. Mist the L’Oréal Paris Infallible Pro-Spray and Set Makeup Oil-Free Setting Spray evenly over your face. Voila!
Now that you’re an oval makeup brush pro, why not use them to create more makeup looks? Check out our article, 7 Simple Everyday Makeup Looks, for inspiration.
